16 KiB
Add the Mapzen Search geocoder to a map
Mapzen Search is a modern, geographic search service based entirely on open-source tools and open data. Use this functionality to enhance any app that has a geographic context, such as ones that help in delivering goods, locating hotels or venues, or providing local weather forecasts.
Through a process known as geocoding, Mapzen Search allows you to enter an address or the name of a landmark or business, and the service translates the result into geographic coordinates for mapping. Mapzen Search is built on Pelias, an open-source geocoding project.
In this walkthrough, you will learn how to make a map with a search box that allows you to enter addresses and place names and locate them on a map. To complete the tutorial, you should have some familiarity with HTML and JavaScript, although all the source code is provided. You also need a Mapzen Search API key, which requires a GitHub account for authorization. You can use any text editor and operating system, but must keep an Internet connection while you are working.
Sign up for a Mapzen Search API key
To use the geocoding service, you must first get a Mapzen API key. Because the search service is shared among many users, an API key is a way to make sure that the performance is acceptable for everyone. Sign in at https://mapzen.com/developers to create and manage your API keys.
- Go to https://mapzen.com/developers.
- Sign in with your GitHub account. If you have not done this before, you need to agree to the terms first.
- Create a new key for this project and, optionally, give it a project name so you can remember the purpose of the key.
- Keep the web page open so you can copy the key into the source code later.
Create an index page
You are ready to start building your map. You will need to use a text editor to update the HTML.
Suggested text editor applications include Atom - OS X, Windows, Linux; Notepad++ - Windows; TextWrangler - OS X; and Sublime - OS X, Windows, Linux; free trial. While you can use the apps installed with your operating system, such as Notepad or TextEdit, they do not provide the helpful indentations, code coloring and autocomplete, or text alignment options found in the other editors. For TextEdit, you must go to the Format menu and click Make Plain Text to use the plain-text version of the file. Do not use an app that applies rich formatting, such as Word or Wordpad.
The end of this walkthrough has a finished version of the HTML that you can use to check your work or review if you need to troubleshoot an error.
-
Start your text editor with a blank document and copy and paste the following HTML. (Note: If the text editor you are using requires you to name and save a document at the time when it is first created, call the file
index.html.)<!DOCTYPE html> <html> <head> </head> <body> </body> </html>These form the basic structure of an HTML document.
<!DOCTYPE html>goes at the top of every HTML page and indicates that it is written for HTML5, and the<html>tags tell your browser that the content is HTML. The<head>tag contains the title for the page and other metadata about the page, while the<body>is where you add the code and the rest of the content on your page. There are many web tutorials available to help you experiment with and learn more about HTML documents and the tags in them. -
In the
<head>tag, add a title, such as<title>My Geocoding Map</title>. -
On the next line, add a metadata tag so you can properly display diacritics and characters from different languages.
<meta charset="utf-8"> -
Name your the document
index.html(where the file name isindexand the type is.html) and save it. -
Drag your index.html file onto a web browser tab. It should show your title,
My Geocoding Map, but the web page canvas will be blank.
Your HTML should look like this:
<!DOCTYPE html>
<html>
<head>
  <title>My Geocoding Map</title>
  <meta charset="utf-8">
</head>
<body>
</body>
</html>
Add references to CSS and JavaScript files
The Leaflet JavaScript library provides tools for building an interactive map for web and mobile devices. Leaflet is extensible, and developers have built additional tools for Leaflet maps, including the Mapzen Search geocoder plug-in.
A cascading style sheet (CSS) is used to style a webpage, including layout and fonts, and JavaScript adds functionality to the page. In your index.html file, you need to list the CSS and JavaScript files required for building a page with Leaflet and the geocoder plug-in.
-
In
index.html, at the bottom of the<head>section, add references to the Leaflet CSS and JavaScript files. You are linking to these from a remote website, rather than from a file on your machine.<link rel="stylesheet" href="https://cdnjs.cloudflare.com/ajax/libs/leaflet/0.7.5/leaflet.css"> <script src="https://cdnjs.cloudflare.com/ajax/libs/leaflet/0.7.5/leaflet.js"></script> -
In the
<head>section, directly after the lines you added for Leaflet, add references to the geocoder's CSS and JavaScript files. These are also being linked to on a website.<link rel="stylesheet" href="https://cdnjs.cloudflare.com/ajax/libs/leaflet-geocoder-mapzen/1.4.0/leaflet-geocoder-mapzen.css"> <script src="https://cdnjs.cloudflare.com/ajax/libs/leaflet-geocoder-mapzen/1.4.0/leaflet-geocoder-mapzen.js"></script> -
Save your edits and refresh the browser. The webpage should still appear empty because you have not added any code to interact with these references.
After adding these, your index.html file should look something like this.
<!DOCTYPE html>
<html>
<head>
<title>My Geocoding Map</title>
<meta charset="utf-8">
<link rel="stylesheet" href="https://cdnjs.cloudflare.com/ajax/libs/leaflet/0.7.5/leaflet.css">
<script src="https://cdnjs.cloudflare.com/ajax/libs/leaflet/0.7.5/leaflet.js"></script>
<link rel="stylesheet" href="https://cdnjs.cloudflare.com/ajax/libs/leaflet-geocoder-mapzen/1.4.0/leaflet-geocoder-mapzen.css">
<script src="https://cdnjs.cloudflare.com/ajax/libs/leaflet-geocoder-mapzen/1.4.0/leaflet-geocoder-mapzen.js"></script>
</head>
<body>
</body>
</html>
Note that you are linking to a website that is serving the geocoder's CSS and JavaScript, but you can also view, download, and contribute to the source code if you want to access the contents of the plug-in.
Add a map to the page
To display a Leaflet map on a page, you need a <div> element, which is a container on the page that groups elements, with an ID value. If you want to know more about initializing a Leaflet map, see the Leaflet getting started documentation.
-
At the bottom of the
<head>section, after the references you added in the earlier steps, add a<style>tag and the following attributes to set the size of the map on your webpage.<style> #map { height: 100%; width: 100%; position: absolute; } html,body{margin: 0; padding: 0} </style> -
At the top of the
<body>section, add the<div>.<div id="map"></div> -
Directly after the
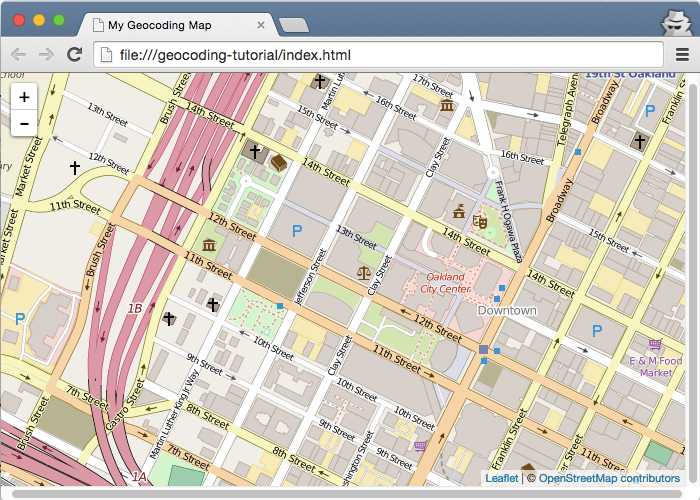
<div>, add this JavaScript code within a<script>tag to initialize Leaflet.<script> var map = L.map('map').setView([37.804146, -122.275045], 16); </script>L.xxxxxis a convention used with the Leaflet API. ThesetView([37.804146, -122.275045], 16)part sets the center of the map, in decimal degrees, and the zoom level. The map is centered in Oakland, California, with a zoom level that allows you to see the streets and features of the city. Zoom levels are like map scales or resolutions, where a smaller value shows a larger area in less detail, and a larger zoom level value depicts smaller area in great detail. -
Within the same
<script>tag, start a new line and set the data source for the map. This line adds the default OpenStreetMap tiles and an attribution.L.tileLayer('http://{s}.tile.osm.org/{z}/{x}/{y}.png', { attribution: '© <a href="http://openstreetmap.org/copyright">OpenStreetMap contributors</a>' }).addTo(map); -
Save your edits and refresh the browser.
Your index.html should look something like this:
<!DOCTYPE html>
<html>
<head>
<title>My Geocoding Map</title>
<meta charset="utf-8">
<link rel="stylesheet" href="https://cdnjs.cloudflare.com/ajax/libs/leaflet/0.7.5/leaflet.css">
<script src="https://cdnjs.cloudflare.com/ajax/libs/leaflet/0.7.5/leaflet.js"></script>
<link rel="stylesheet" href="https://cdnjs.cloudflare.com/ajax/libs/leaflet-geocoder-mapzen/1.4.0/leaflet-geocoder-mapzen.css">
<script src="https://cdnjs.cloudflare.com/ajax/libs/leaflet-geocoder-mapzen/1.4.0/leaflet-geocoder-mapzen.js"></script>
<style>
  #map {
    height: 100%;
    width: 100%;
    position: absolute;
  }
  html,body{margin: 0; padding: 0}
</style>
</head>
<body>
<div id="map"></div>
<script>
var map = L.map('map').setView([37.804146, -122.275045], 16);
L.tileLayer('http://{s}.tile.osm.org/{z}/{x}/{y}.png', {
attribution: '© <a href="http://openstreetmap.org/copyright">OpenStreetMap contributors</a>'
}).addTo(map);
</script>
</body>
</html>
At this point, you have a map! You should see a map with OpenStreetMap tiles, zoom controls, and a Leaflet attribution in the bottom corner.
Add the Search box
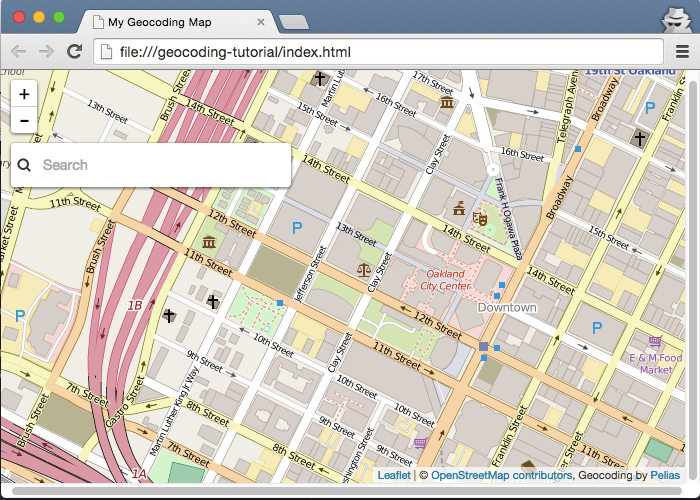
So far, you have referenced the necessary files, initialized Leaflet with a map container on the page, and added data to the map. Now, you are ready to add the Search box from the Mapzen Search plug-in.
-
Go back to the https://mapzen.com/developers page and copy your API key to the clipboard.
-
Inside the same
<script>tag, start a new line after the}).addTo(map);line. Initialize a search box with the following code and your own API key substituted for the placeholder text ofmapzen-xxxxxx.var geocoder = L.control.geocoder('mapzen-xxxxxx').addTo(map);The
mapzen-xxxxxxtext is the Mapzen Search API key; paste your own API key inside the single quotes. -
Save your edits and refresh the browser. You should see a small magnifying glass icon in the left corner, near the zoom controls.
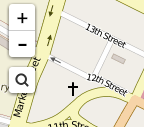
-
Click the button to display the Search box on the map. The Search box closes if you click away from it.
Your <body> section should look like this:
[...]
<body>
<div id="map"></div>
<script>
var map = L.map('map').setView([37.804146, -122.275045], 16);
L.tileLayer('http://{s}.tile.osm.org/{z}/{x}/{y}.png', {
attribution: '© <a href="http://openstreetmap.org/copyright">OpenStreetMap contributors</a>'
}).addTo(map);
var geocoder = L.control.geocoder('search-xxxxxx').addTo(map);
</script>
</body>
[...]
Search for places on the map
-
On the map, type
555 12thin the Search box. As you type, the text automatically completes to suggest matching results. -
In the results list, find the entry for
555 12th Street, Oakland, CAand click it to zoom and add a point to the map at that location. (The point is only on your map, and does not update OpenStreetMap.)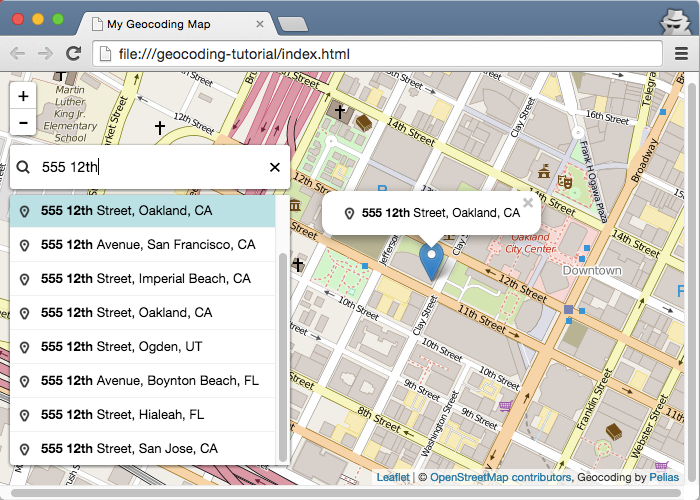
If you want to customize the geocoder plug-in behavior beyond the defaults in this Walkthrough, you can set additional options in your code. For example, the Search box collapses to an icon by default, but you can specify that the text box be shown at full width. There are also options for customizing the parameters for the Mapzen Search service, such as limiting the search to the map's extent or prioritizing results near the current view. Right now, you may notice that results from around the world appear in the list.
Mapzen Search uses a variety of open data sources, including OpenStreetMap. Part of the power of open data is that anyone can change the source data and improve the quality for everyone. If you are unable to find a location, the place could be missing or incorrect in the source datasets. Mapzen is also building a comprehensive, open database of places known as Who's on First that can be publicly edited, and is working on integrating it into the geocoder.
Walkthrough summary
In this walkthrough, you learned the basics of adding the Mapzen Search geocoding engine to a Leaflet map. If you want to learn more about Mapzen Search, review the documentation.
Because the geocoder is still under development and considered experimental, if you are getting unexpected search results, please add an issue to the Pelias GitHub repository. The developers can investigate and decide if the problem is caused by software or data, and work to fix it either way.
To take your map even further, you can follow along with some additional Mapzen tutorials. One exercise you can try is to use Mapzen's Tangram rendering engine and vector tiles to draw the data on the map, instead of the OpenStreetMap raster tile layer you used in this walkthrough. When you get your map the way you want, you might be interested in putting your map on the web so you can share your work with others.
Completed HTML for this walkthrough
You can refer to this HTML if you want to review your work or troubleshoot an error. You will need to substitute your own API key for the placeholder text in the source code.
<!DOCTYPE html>
<html>
<head>
<title>My Geocoding Map</title>
<meta charset="utf-8">
<link rel="stylesheet" href="https://cdnjs.cloudflare.com/ajax/libs/leaflet/0.7.5/leaflet.css">
<script src="https://cdnjs.cloudflare.com/ajax/libs/leaflet/0.7.5/leaflet.js"></script>
<link rel="stylesheet" href="https://cdnjs.cloudflare.com/ajax/libs/leaflet-geocoder-mapzen/1.4.0/leaflet-geocoder-mapzen.css">
<script src="https://cdnjs.cloudflare.com/ajax/libs/leaflet-geocoder-mapzen/1.4.0/leaflet-geocoder-mapzen.js"></script>
<style>
#map {
height: 100%;
width: 100%;
position: absolute;
}
html,body{margin: 0; padding: 0}
</style>
</head>
<body>
<div id="map"></div>
<script>
var map = L.map('map').setView([37.804146, -122.275045], 16);
L.tileLayer('http://{s}.tile.osm.org/{z}/{x}/{y}.png', {
attribution: '© <a href="http://openstreetmap.org/copyright">OpenStreetMap contributors</a>'
}).addTo(map);
//Use your own API key in place of this one. Get a key at mapzen.com/developers.
var geocoder = L.control.geocoder('mapzen-xxxxxx').addTo(map);
</script>
</body>
</html>